Frankenmouse: Kensington Thinking Mouse with USB, scroll wheel,
and optical sensor
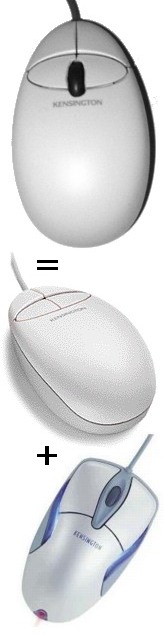 The Kensington Thinking Mouse is, in my experience, the best mouse ever
made, with a comfortable shape and plenty of programmable
buttons. Unfortunately, time has passed it by. A modern pro mouse requires
a scroll wheel, an optical sensor, and a USB connector. Kensington now
only uses the Thinking Mouse's form factor on one- two-button mice,
clearly not enough for those of us who have known the power of four buttons.
The Kensington Thinking Mouse is, in my experience, the best mouse ever
made, with a comfortable shape and plenty of programmable
buttons. Unfortunately, time has passed it by. A modern pro mouse requires
a scroll wheel, an optical sensor, and a USB connector. Kensington now
only uses the Thinking Mouse's form factor on one- two-button mice,
clearly not enough for those of us who have known the power of four buttons.
While searching for a USB replacement for my beloved but obsolete Thinking
Mouse, I tried Kensington's Mouse-in-a-box Optical Pro. This is a terrible
mouse - too big for my hands, with flimsy, ill-positioned buttons - but
the internal circuit board and switch positions are similar to those of the
Thinking Mouse. With the aid of a soldering iron and liberal use of a
Dremel tool, I built the Frankenmouse: the hardware of a Mouse-in-a-box
Optical Pro transplanted into a Thinking Mouse case.
Top view |
Side view |
Bottom view
Parts:
- One Kensington Thinking Mouse.
- One Kensington Mouse-in-a-box Optical Pro (USB) (part number 72112, not the later Mouse-in-a-box Optical Pro 2.0).
Only the plastic shell for the Thinking Mouse will be used. Save a few
bucks by buying the PS/2 model, and leave the rarer ADB
version for users of beige Macs. The PS/2 version is about $10 on eBay.
The Mouse-in-a-box Optical Pro is no longer sold by Kensington, but
can usually be found on eBay for about $10. I don't
whether any other Kensington mice will work well.
There appear to be at least two revisions of the Optical Pro, with
slightly different internal circuitry and plastics. I have successfully
built a Frankenmouse with both versions.
Tools:
- Soldering iron and solder
- Solder sucker
- Dremel tool (or other tools suitable for shaping plastic and cutting
circuit boards)
- Small gauge wire with matching wire cutter and stripper
- Small Philips screwdrivers
0. Disclaimer
This worked for me, twice. It may not work for you. It is not recommended
or supported by Kensington, and will certainly void your warranty. If
something goes wrong, you could break: two perfectly good mice, your
computer, your tools, yourself, and anything that gets close to your
soldering iron or Dremel tool. Don't try this at home. Void where
prohibited. For entertainment purposes only. Ask your mom or dad for help
first.
1. Dismantle
Taking stuff apart is always the best part.
- The Thinking Mouse has two screws in the base under the sticker.
- Keep the shell of the Thinking Mouse. You may also want to keep the
circuit board for later use (see below).
- The Optical Pro has four screws in the base, one under the foot in
each corner.
- The Optical Pro's scroll wheel can be tricky to remove. I pulled the
button side of the wheel axle up hard until it popped out of the blue
base, and then slid the wheel out of the circuit board mount.
- Keep the Optical Pro's circuit board, USB cable, scroll wheel, blue
base, and optical plate (the circular or rectangular piece of clear
plastic). Marvel at the complexity of the molded plastic shell, then throw
it away.
2. Rearrange switches
The four switches of the Optical Pro's four buttons need some
rearrangement in order to work with the Thinking Mouse's shell.
- The front two switches of the Optical Pro become the back two switches of
the Thinking Mouse. They need to be flipped 180 degrees in order for the
switch plunger to fall under the button. Unsolder a switch, turn it so the
plunger is on the inside, resolder it, and add a wire connecting the outer
two pins of that switch. Repeat for the other switch.
- Remove the switches for the Optical Pro's side buttons. They will be
reinstalled as the Thinking Mouse's front two buttons when construction is
almost complete.
- The switches for the Optical Pro are stiffer than those on the
Thinking Mouse. You may want to replace the Optical Pro's switches with
those from the remains of the Thinking Mouse.
Switch wiring
3. Reshape the circuit board
The Optical Pro's two-part circuit board is too wide and too long to fit
inside the Thinking Mouse. A Dremel tool and soldering iron can solve that
problem.
- Some of these modifications will sever traces on the circuit
board. Before cutting, remember to draw a picture of the existing traces
so you can add replacement wires if necessary.
- The board needs to be shortened enough so the switches will fall under
the Thinking Mouse's back two buttons. Examine the Thinking Mouse shell to
determine the desired length.
- Target: the front corners of the board. Cut these as close as you can
to the switches.
- Target: the sides of the front half of the board. Don't be too
aggressive here; it's easy to widen the inside of the shell too.
- Target: the back of the board around the taillight. Watch for traces:
one Optical Pro I used had traces behind the taillight, but another
didn't. Fold the taillight straight up and cut close to the light's mount
points. Leave the light folded up.
- Target: the edge between the two halves of the circuit board. Most of
this area is wasted space, and we need these extra millimeters to shorten
the board. Draw a picture of the traces connecting to the jumper wires on
each side; cut the jumper wires; trim the boards back until you hit
components; add wires to replace the jumper wires and any traces.
- After shaping the board and adding wires, you may want to test the
mouse by plugging it into a computer. The taillight should light up, the
two remaining button switches should work, and the cursor should move if
you insert the optical plate and hold the mouse at the right height. Of
course, you might fry your computer if you've reconstructed the circuit
incorrectly.
Finished board |
Diagram of areas cut from board
4. Reshape the inside of the shell
The inside of the Thinking Mouse's shell needs to be expanded slightly to
make room for the new circuit board and its optical sensor.
- Remember the target position: the switches must land in the right
place. Everything else merely needs to fit.
- Cut notches in the two screw posts so the back half of the board can
slide in.
- The new circuit board will eventually rest at the same height as the
old one, but some of the raised parts on the bottom need to be removed to
make room for protruding pins.
- Cut notches in the side and back of the shell to make room for wide
parts of the board.
- The back of the top half of the shell may need to be thinned to make
room for the taillight. (This conveniently makes the plastic more
translucent so the light will be more visible.)
- The scroll whell mount is tall enough to hit the bottom of one of the
shell's button arms. Cut away part of the arm and make sure the button
travels freely. Cut as little as possible; you don't want to weaken the
buttons.
- When you're done, the board should fit snugly and two of the buttons
should work.
Circuit board in place
5. Position optics
The optical plate needs to be positioned at the proper height for the
optical tracking to work. The existing hole for the mouse ball is in the
wrong place, so a new hole needs to be cut for the optics.
- The optical plate may be rectangular or circular, depending on the
revision of your late Optical Pro mouse. If it's circular, cut down the
sides to make it narrow enough to fit between the two screw posts.
- The right height for the optical plate is flush with the inside bottom
of the shell. Flatten any protruding elements, and flatten or remove the
part of the shell that rises at the old mouse ball ring.
- Make sure the mouse tracks well when you're done. If your circuit
board is still too long, it may buckle slightly when the shell top is
attached, or the back half of the board may ride up over the front
half. Either of these may cause the optics to be at the wrong height.
6. Make room for the scroll wheel
The original Thinking Mouse has neither a scroll wheel nor a hole for
one. The new mouse needs both.
- When dismantling the button assembly, watch out for two hooks at the
very front of the two front buttons. These break off easily, though they
won't be missed much if they do break.
- The thick cylinder of the scroll wheel that sits over the scroll wheel
switch obstructs the button arm slightly, just like the scroll wheel mount
on the other side. Thin the arm so the button and wheel move freely.
- I didn't reuse the scroll wheel attachment from the Optical Pro's blue
base. This means the wheel is poorly supported and tends to slide from side to
side. You may want to try to use that part of the base. If you instead
allow the wheel to float, you may want to cut the scroll wheel hole
slightly toward the scroll wheel mount, so the wheel can fit more securely
in the mount.
- The wheel sits rather low and does not protrude much above the top of
the mouse. Be generous with the opening on the top side so there's plenty
of room for your finger to reach the wheel and turn it both ways. Also
make sure you can comfortably click the wheel without pressing the other
two buttons.
- Sharp edges on the outside around the wheel are obviously
annoying.
7. Reattach switches
The two extra buttons on the Thinking Mouse separate the power users from
the newbies. Attach the two switches under the front two buttons and feel
your computing skills instantly improve.
- The front switches need to be quite close to the back switches; notice
how they're almost touching on the old Thinking Mouse. You may need to cut
notches in the circuit board in order to mount the switches close
enough. Watch out for a trace along the front of the board.
- Connect the two switches to the connection points for the old side
switches. Leave the outside pins of each switch wired together.
- I found it convenient to cut off the front tip of the old Thinking
Mouse circuit board to hold these switches in place. If you do this, there
are two traps. The existing traces on the board fragment are wrong; sever
them with the Dremel tool. There may be electrical contact between the
main board and the new board fragment; I used a bit of masking tape to
provide insulation, and another strip of tape to tie the two boards
together.
8. Enjoy
Your new and improved mouse is complete. Download some drivers from
Kensington or USB Overdrive and sell your
USB-ADB adapter on eBay.
Frankenmouse |
top view |
side view |
bottom view |
switch wiring |
circuit board |
board cut diagram |
board in place
home: Sealie Software
mail: gparker-www@sealiesoftware.com